Archive | Uncategorized RSS feed for this section

Learning Styles

20 Nov

learning-style

This week in my grad class we learned that learning styles don’t exist. Take that in. Challenge it if you will, but after reading multiple articles and watching this particularly convincing TED talk (Don’t Believe Everything You Think), I’m positive that learning styles are not a viable concept.

One of the things that stood out to me from the TED talk was that many people have learning preferences, but in research studies these preferences don’t actually enhance learning. You may prefer to get information visually, but that doesn’t mean when presented with visuals you’re more likely to learn than someone who prefers learning by hearing. True learning is meaning-based, and depends on how you want students to demonstrate their learning. For example, if I want my students to be able to identify three-dimensional solids from pictures, I should give them visual lessons because this is a visual skill. Regardless of their learning preference all students would benefit from seeing images of 3D solids. They might also benefit from holding examples of 3D solids, but this activity is beneficial for all students, not just the “tactile learners.”

This is the good part: not all our time spent creating activities to reach “different learners” is a waste, because differentiation is good for all students. It may be that one extra example that helps students to make a connection, but having that connection doesn’t make a student a certain type of learner.

Another key take-away from this week’s studies was the importance of background knowledge. In the TED talk linked above Dr. Tesia Marshik gives a great example debunking learning styles using a chess board. Subjects were shown images of chess boards and then were asked to recreate the arrangement of the pieces. Those subjects with knowledge of chess pieces and their movements on a board outperformed their peers. This doesn’t mean they are visual learners, it means they know more about chess. However when the pieces were shown at random places on the board that didn’t follow the rules of chess those familiar with chess scored in the same range as those who were unfamiliar. This demonstrates the importance of background knowledge and skills.

In applying this new-found knowledge in my classroom I will make sure I’m not just implementing activities for the sake of saying “Oh I’m trying to reach my kinesthetic learners.” I will approach planning from the perspective of looking for additional methods I can use to reach all my learners. I will also be sure to stop saying learning styles and instead call them what they actually are: learning preferences.

I encourage you to watch the TED talk. Also I encourage you to keep differentiating. I hope to continue to update this blog with ideas to help you do so in the classroom.


Group Gigs (aka Group Job Titles)

3 Sep

Group GigsI’m slightly obsessed with alliteration, and I really want my group work/centers to be successful this year. Keeping those two things in mind I created a system that I hope will be really beneficial for group work this year. Yesterday I described the trays I use as notebooking supply stations. On these trays I’ve taped four numbers, and each of the four numbers is a different color. The numbers are how I give new seats and randomly call on students. The colors are for group jobs.  I also have a poster in the front of my room with job titles and colored arrows that match the colors on the tray numbers. I rotate the arrows each morning. As you can see from the photo my job titles are Discussion Director (I feel like I stole this from lit circles), Class Communicator, Inquiry Investigator, and Materials Master. Since I had all these alliterative titles, I felt like Group Job Titles just wasn’t cutting it. So that’s why I’m calling them my Group Gigs.

Check out the pics of the colored numbers on the trays –

TraysDescriptions of Gigs

Discussion Director

This student is essentially the leader of the group. He or she will always go first, and lead the discussion. He or she will also make sure all group members have completed their task before moving on. I also am going to have the Discussion Director go first when playing games or centers.

Class Communicator

This student will report group findings to the entire class. So after they’ve had time to work in groups, when we bring it back to the whole class, the Class Communicator will share his or her groups’ answers or decisions. (This prevents the same person from always sharing).

Inquiry Investigator

This student’s job is all about questions. It’s almost like he or she is the group liaison with the teacher. If the group has a question, the Inquiry Investigator seeks me out to ask the question. Then he or she will report back to the group. Also if I’m checking in on groups while they are working, the Inquiry Investigator is responsible for telling me how the group is doing. This is different from the class communicator. The Inquiry Investigator communicates just with me, not with the whole class.

Materials Master

The student who is the Materials Master is in charge of making sure all the supplies get back into the tray. He or she is also responsible for letting me know if materials need to be replaced. The Materials Master is the only student who has a job every day. If we’re not doing group work for some reason the other three get the day off.

Notebook PageI designed these groups so that each student would have some accountability. I’m really looking forward to implementing them. To introduce the jobs to the students we created a page in their notebooks with Gig Descriptions. I had students copy me, and we wrote down what each Gig “Does” and “Does Not”. We discussed each job and several scenarios. We also spent some time talking about what “Inquiry” means.


Here’s what I had the students put in their notebook…

Notebook Job DescriptionsSample Implementation of Group Gigs

Say you give your students 5 problems to work on in groups. Everyone would start working on the problems 1 by 1. When the Discussion Director notices everyone has completed the first problem he says “I got 17 for problem one. Did anyone else get a different answer?” They all agree except for one person. That student explains why her answer is correct. Now the group cannot decide who is right. They send the Inquiry Investigator to me so I can check their work. They move onto the next problem. Meanwhile I’m checking with another group’s Inquiry Investigator to see what his group got for problem 1. After I’ve given the groups time to finish the five problems, and I’ve checked in with every Investigator, I bring the whole class back together. I start by asking group 1’s Class Communicator to share their findings for problem 1, ask the other Communicators if they got the same or different answer, and then continue to check answers. At the end of the class I remind the Materials Master to check the supply tray and report any issues to me.

How do you use group jobs in your classroom? Hopefully you can use some of my ideas here, but feel free to adjust for your needs.

Classroom Organization

3 Sep

Today I want to share some of the ways I’ve set up my classroom. This year I started at a new school and got the chance to set-up my classroom from scratch. The only problem was that my new classroom is the former computer lab. It’s a very narrow room, and is not really meant for large group instruction. So I had to set it up in a way that allows for maximum efficiency. Here are some of the things I setup.

Supply Pouches

Image

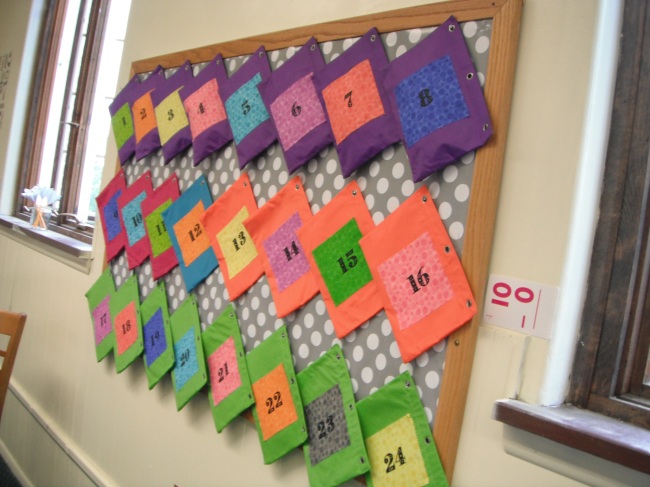
Supply Pouches hanging on a bulletin board.

The first thing that I did was setup a bulletin board for supplies. One of the things I hate is taking up class time to pass out supplies. I also hate having to collect them, and make sure I get all the supplies back. So I spent some money to setup my supply-pouch system. Overall it’s not super expensive per pouch, and you might be able to use things you already have. I got 24 pencil pouches in assorted colors. Then I painted the numbers 1-24 on each pouch. You would need a pencil pouch for each student in your largest class. Then I filled the pouches with a ruler, dry-erase marker, dry-erase eraser, scissors, protractor, compass, and glue stick. I also wrote a number on each of these to match the bag that the supply is in. That way if you or a student finds one on the floor, they know where it goes. Then at the beginning of the year I assign each student a number. Usually I go by alphabetical order. Then if we need supplies I will have students get their own pouch when they come into the room, or call them up 8 at a time to get their pouches. I like this system because you know who’s not gotten their pouch, or who hasn’t turned theirs’ in yet. You also know who breaks something or accidentally takes something. I’ve found this system to be really efficient, and it’s a nice way to use a bulletin board as storage. I just put up push pins and hang the pouches on the push pins. The kids seem to really enjoy using the pouches too. It’s like a special treat for them.

Image

Pouch 16 with all the numbered supplies that are inside.

Student Selection

This year I’m trying something new with number cards. I know several teachers use popsicle sticks to select students for various things. Being that I do teach math I use number cards. I started by making two sets of number cards with the numbers 1-20. (I used 1-20 because 20 is the size of my largest class. I know I’m very lucky). I made the odd numbers blue and the even numbers red. This was for two reasons. First of all this allows me to easily tell 6 and 9 apart. Also this helps with my littler ones learning their odds and evens. I drew the numbers on graph paper and then laminated them since I’ll be using them frequently.

Image

Laminated number cards.

Since I’ve already assigned students a number for their pouch, I use that same number. Then if I need to randomly select a student I will shuffle the cards and draw one. I also use it for randomly choosing groups, and seating charts.

This year I also used the numbers on the first day of school. Instead of the students coming in and just sitting at a random seat, or me putting their names on the desks, I taped a number to the desk and then handed each student a number card as they walked in. That way the knew where to sit and it was a nice way to a make sure I greeted every student. Also the numbers on the desk helped me to quickly put students in alphabetical order in a seating chart.

Image

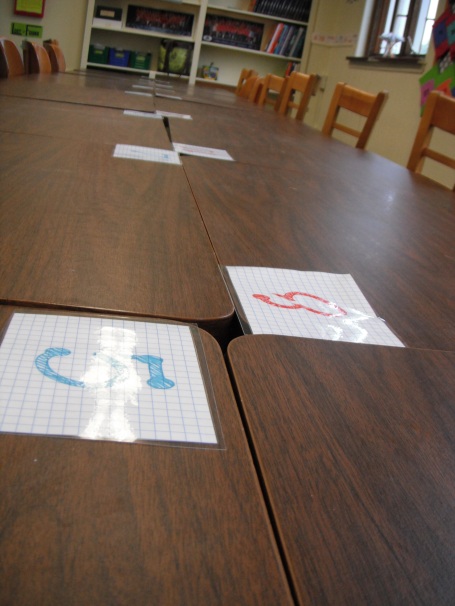
Number cards taped on the corners of the desks.

Lost and Found

Image

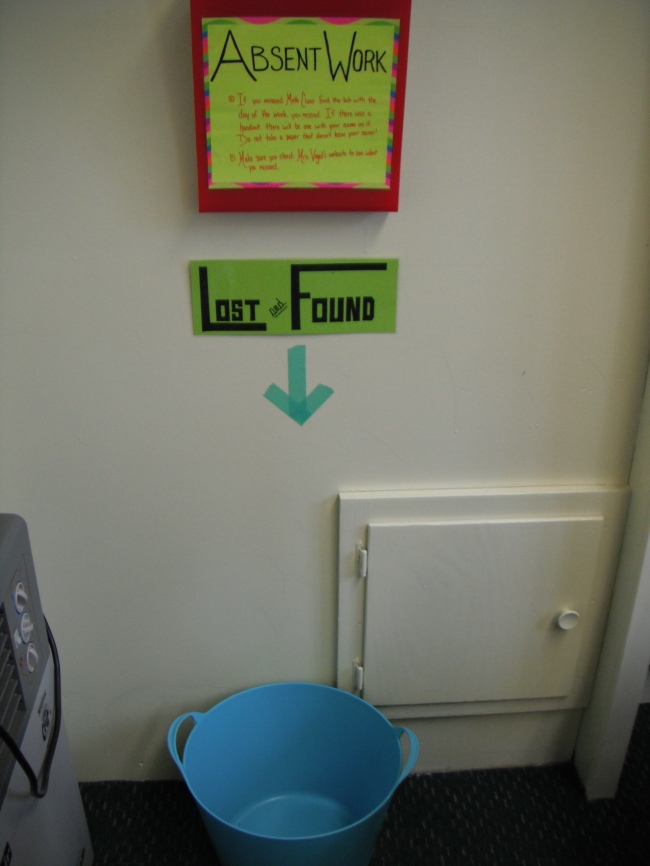
Lost and Found bucket and Absent Work Folder

Since I teach middle school, I have students coming in and out of my room all day. And of course they are constantly leaving things. I’m really not a fan of students always saying “I found this book, what should I do with it?” Or when they interrupt my lesson to ask if they left their binder. So I always make sure I have somewhere for a lost and found. Again I have limited space this year so here’s my lost and found bucket.

Absent Work Folder

This is one of my favorite organizational things in my room. The absent folder. You’ll see it on the wall above my lost and found bucket. I got a vertical accordion file folder. I cut off the lid/flap and then mounted it on the wall. I labeled the folders with the days of the week. If a student misses Monday, I write their name on any handouts or worksheets from Monday and put it in the Monday slot. Then they know to check it when they return. It’s also great if a parent shows up asking for work. I know exactly where to look. I try to make a habit of putting absent work in the folder when I’m passing out papers to the students that are in class. I’ve tried a few different systems, but I find this one to be really great for middle school.
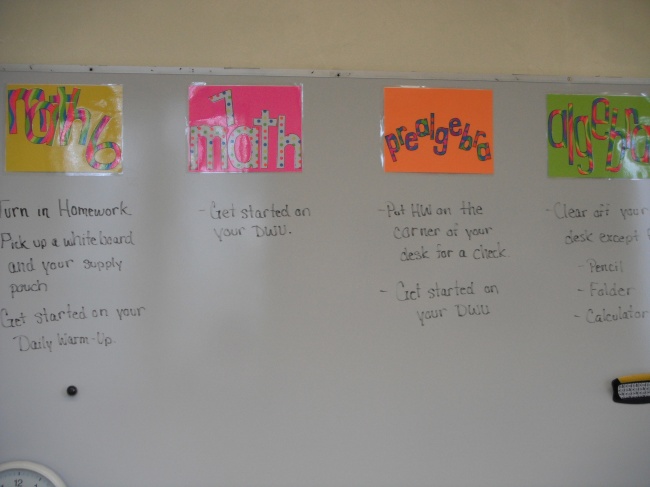
Bellwork Board

A lot of teachers always put bellwork up when students enter. Or maybe a Daily Warm Up or something similar. I like to put up directions. Students know that when they first enter my room they are to look at the whiteboard under their class name to find out what they should be doing. You’ll see some examples of the directions in the picture below, but here are some examples of the directions I’ve put up during the year.

  • Clear off your desk except for a pencil and a calculator (Test or Quiz Day instructions)
  • Get your supply pouch and a white board.
  • Turn your homework into the tray.
  • Get started on the problems shown on the board.
  • Get out your homework for a check.

Generally I will have several instructions written. Students are expected to follow the directions and have them all done by the time I start class by saying “Good Morning” or “Good afternoon” I’ve found this to be a great system, and it’s easy to train the students to always follow directions on the board.

ImageI hope you find these helpful. It’s never too late to organize your classroom!

By the Numbers First Week of School Activity

19 Aug

This is a new activity I’m going to try this year. I think it’s going to be a great way for me to share some facts about me with my students, and for me to learn about them. And they have to use numbers to tell me (and their classmates) about themselves. I call it a first week of school activity, but it could be used for the first day, or later in the first week or even assigned as a homework assignment in the first week.

I created a worksheet that has a box in the center and says “By the Numbers” underneath the box. I’m going to start by showing the students my example…

Image

My example. I chose numbers that I could use to tell students more about me. For example the 12 is the number of the QB on my favorite team (the Colts) and my least favorite team (the Patriots). This way they’ll learn that I’m a big sports/football fan.

I’ll have students write their name above the box and then draw a self portrait in the box. Then I’m going to have them write at least 5 facts around the box using numbers. For example “3 = the number of siblings I have” or “20 = the number of books I read this summer”.  I’m probably going to give students about 15 minutes to write their facts and draw the self portrait. Then I’m going to have them share some of their facts with me and the class. Depending on the time left and the number of students in each class, I will limit the number of facts they share.

I think this will be a fun way to get info about my students, instead of having them just fill out info sheets. Plus I love the fact that it uses numbers.

If you want the PDF that I’m going to pass out to students you can get it for free on my TpT site. I highly encourage using this with your math students, and especially make your own to share with them!

http://www.teacherspayteachers.com/Product/First-Day-By-the-Numbers-Worksheet-836252

Planner Pains

15 Aug

Each year I browse the school sections at Target, WalMart, Office Depot and so on. I love seeing all those shiny new school supplies and it gets me even more excited about the upcoming school year. I always check out the school planners. I love school planners, but I can never find one that I think is good enough for my teaching plans. So this year I decided to create my own pages.

Image

Last year I taught 3 sections of 7th grade math, and 3 sections of 7th grade preAlgebra. So I just used a regular planner and had two columns. This year I’m going to be teaching Math 6, Math 7, PreAlgebra, and Algebra. I’m going to have to be much more organized in order for each class to be successful. I’m not big on writing out super long lesson plans, but I like to have a general description down. So I wanted to share with you all what I created. I’m also going to put it on TpT for free, so you can customize it for yourself it you want. I used Excel, so the formatting may be difficult if you’re not used to using Excel.

So basically I’m going to print several of these and put them in a three ring binder with my other needed teacher documents.

How do you all document lesson plans? I’m open to any suggestions!

Link to TpT site : http://www.teacherspayteachers.com/Product/Editable-Lesson-Plan-Pages-829246


Math Wreath

13 Aug

ImageSometimes I think I should teach art, and then I remember I really don’t like art, I like crafts. Like may not be strong enough a word. I LOVE CRAFTS! I try to work them into math class as much as possible. Here’s my latest craft project: A Welcome Wreath for my classroom door! It was a lot easier to make then I thought it would be, and I love the look of it. Great way to use those old wooden rulers hanging out in your classroom cabinet!

Materials you’ll need…

  • 18 wooden rulers
  • 6 inch hoop (I used an embroidery hoop)
  • Your choice of embelishments
  • Ribbon for hanging
  • Exacto Knife
  • Hot Glue Gun and Glue

First you need to cut the rulers in half. I did this by scoring the ruler on both sides around the 6 inch mark. Then I just broke the ruler in half.

Image

Then glue one round of rulers on the hoop. I started at the top (12 o’clock) then did the bottom (6 o’clock), then left and right (3 and 9 o’clock). Then I put a half-ruler in between each of these.

ImageThen I flipped the ring over and put a half-ruler in between each of the already glued rulers. They’re not going to fit perfectly. You’re basically making a second layer.

ImageThen I glued on my embellishments. I made a few flowers out of old textbooks, and then some chalkboards with my name. Then I used a sharpie to color some wood letters black and glued those on. I used a ribbon to hang it. Hopefully my students will like it as much as I do!

Image


New Year’s Resolution

5 Aug

It’s almost the start of the school year!! It’s that great time of year when I’ve forgotten all the terrible parent emails, the long (seemingly pointless) meetings, and the headaches that often come with teaching. I’m full of ideas for the new year, and a determination that this year, I’m going to do it right. I’m anxious to set up my classroom, meet my new students, and start the year off right. A lot has changed over the past few months. I’ll be talking about those in my future posts, but today I want to talk about my resolutions for this upcoming school year. I know a lot of teachers make goals for the new year, and I like to make resolutions (that way if I don’t meet my goal, I don’t feel like such a failure! Lame I know). 

My main resolution this year is to keep the excitement  I have right now throughout the school year. It’s so easy to get down about teaching, and frustrated with the grading, emails and management problems. Whenever I get down about the job this year, I’m going to surf some blogs, browse pinterest, and get excited about doing something new with my kids.

Also I resolve to remember that it’s not about me, or my fellow staff members, the admin, or even the parents. It’s about the kids, and making their learning experience as great as possible. This is one I really struggle with during the year. I focus too much on all the bad stuff, and not enough on making it great for the students.

I’m also hoping that throughout the year when I update this blog, I’ll see this post and remember what I want to be working on.

Coming soon … First Day activities, fun classroom ideas, More Math-tastic activities

I hope everyone has a great start to the new school year! I cannot wait to share more with you, and also hear all about the amazing things you’re doing in your classroom.